I recently got an Arduboy, a hackable handheld that I can make games for. There are a lot of awesome games as well, and as an inconsistent but avid gamer, I do want to play the best ones. Unfortunately at the time, the only way for me to do so on a Mac was to clone a game from Github and compile it with the Arduino IDE.
I asked the Arduboy community, and it seems that some software is coming for Mac but I don’t know when. I found some libraries that I could use to upload games to the Arduboy, the easiest one was avrgirl-arduino. Writing a script to do it via the CLI was easy thanks to this awesome library. I figured I’d make an app for it as well.
The app was made with React using the create-react-app tool, and bundled with Electron. The tricky part was setting it up so that I could develop the app in Electron rather than in the browser. The next hurdle was getting the app to access Node.js modules like fs and avrgirl-arduino. If you’re a similar situation, this bit of info might help.
We’ll spin up the basic React app and hook it up to Electron. We’ll then configure it to access Node.js modules. Note that I’ve only tested this on my Mac (running Catalina) so your mileage may vary on other OSes and version. Let’s begin with setting up the app!
Installing
The first step is to create the app. As recommended, we use npx to run create-react-app instead of installing it globally:
npx create-react-app super-appIf you’re like me and make Github repositories first, just run:
npx create-react-app .Drink some tea or coffee while that’s happening. Even with decent internet and a good machine, this sure takes a while…
When I first did that, the scrips were completed but none of the React code was added. It seems that I had an older version of create-react-app installed locally. Even when I uninstalled it with npm, it still existed in my /usr/local/bin. So if the code doesn’t load for you, be sure to remove any global installs of create-react-app.
Now in your app directory, let’s install a few more packages:
Electron which is used to build the app
npm i --save-dev electronConcurrently and Wait-on which are helper utilities we use in our scripts to develop Electron apps with a debugger.
npm i --save-dev concurrently wait-onRescripts which is used to modify create-react-app’s webpack configuration, without ejecting the app. We need this to access Node.js libraries.
npm i --save-dev @rescripts/cli @rescripts/rescript-envNow that everything is installed, let’s set up our app to use Electron for development.
Developing in Electron
By default, you develop React apps in the browser. Since we’re using Electron to make it a desktop app, it’s best we develop in Electron than in the browser. As Electron is built upon the Chromium engine, we want to develop with their developer tools as well.
Let’s start by adding an electron.js file in our public folder. This will become the main point of entry for our app.
Create a new file with this content as public/electron.js:
const { app, BrowserWindow } = require('electron');

// Check if we're running Electron while developing
// It's never a good idea to run developer tools in public
const isDev = process.mainModule.filename.indexOf('app.asar') === -1 ||
    process.mainModule.filename.indexOf('app') === -1;

function createWindow() {
    const appWindow = new BrowserWindow({
        width: 1024,
        height: 768,
        webPreferences: {
            nodeIntegration: true
        }
    });

    // If we are in dev mode, load the React app where it's run by default
    // Otherwise load the compiled app from the build folder
    appWindow.loadURL(isDev ? 'http://localhost:3000' : '../build/index.html');
    if (isDev) {
        // Open dev tools alongside our running app
        appWindow.webContents.openDevTools();
    }
    appWindow.on('closed', () => appWindow = null);
}

app.on('ready', createWindow);

// Quit when all windows are closed.
app.on('window-all-closed', () => {
    // This is taken from their tutorial: https://www.electronjs.org/docs/tutorial/first-app
    // On macOS it is common for applications and their menu bar
    // to stay active until the user quits explicitly with Cmd + Q
    if (process.platform !== 'darwin') {
        app.quit();
    }
});

app.on('activate', () => {
    // This is taken from their tutorial: https://www.electronjs.org/docs/tutorial/first-app
    // On macOS it's common to re-create a window in the app when the
    // dock icon is clicked and there are no other windows open.
    if (BrowserWindow.getAllWindows().length === 0) {
        createWindow();
    }
});
For those curious, I created the isDev function based on this response to a Github issue.
So far so good! Let’s continue by making two edits to your package.json. The first is to make the electron.js file we just created the starting point of our app. In package.json, add a main property like this:
"main": "public/electron.js",We also want to add a script that runs our app in Electron while developing. Add a new script called app-dev like this:
"app-dev": "concurrently \"BROWSER=none npm run start\" \"wait-on http://localhost:3000 && electron .\""Your package.json should look like this:
{
  "name": "react-electron-app",
  "version": "0.1.0",
  "private": true,
  "main": "public/electron.js",
  "dependencies": {
    "@testing-library/jest-dom": "^4.2.4",
    "@testing-library/react": "^9.5.0",
    "@testing-library/user-event": "^7.2.1",
    "react": "^16.13.1",
    "react-dom": "^16.13.1",
    "react-scripts": "3.4.1"
  },
  "scripts": {
    "start": "react-scripts start",
    "build": "react-scripts build",
    "test": "react-scripts test",
    "eject": "react-scripts eject",
    "app-dev": "concurrently \"BROWSER=none npm run start\" \"wait-on http://localhost:3000 && electron .\""
  },
  "eslintConfig": {
    "extends": "react-app"
  },
  "browserslist": {
    "production": [
      ">0.2%",
      "not dead",
      "not op_mini all"
    ],
    "development": [
      "last 1 chrome version",
      "last 1 firefox version",
      "last 1 safari version"
    ]
  },
  "devDependencies": {
    "@rescripts/cli": "0.0.14",
    "@rescripts/rescript-env": "0.0.12",
    "concurrently": "^5.1.0",
    "electron": "^8.2.3",
    "wait-on": "^4.0.2"
  }
}
We have everything set up to run it locally. We should use our script to launch the app in React, and then bring up an Electron window with the Chromium debugger. Let’s run our NPM script:
npm run app-devThis is what we see:

Success! It has the same live reloading you have when developing in the browser. As you make changes to your code, your app is updated. When I develop, I usually have my debugger in a separate window so that my app has all of its real estate.
Now that we got most things set up for development, let’s see how we can use Node.js module in our React apps in Electron.
Accessing Node.js Modules
If you were like me and needed access to a Node.js module, you’re out of luck. React is configured to run in the browser. This is set up by a webpack configuration that’s managed by create-react-app. If we want to edit it, we can always eject the app and manage the configuration and build system ourselves.
When you eject your app, you get access to all the internals that build the app. However, managing all those libraries and configurations can be tedious. I rather keep create-react-app’s defaults so I can focus on my business logic over other technical issues. That’s why we installed rescripts earlier.
We are going to use rescripts to change our webpack configuration so that React knows it’s running in Electron and not in the browser. By using rescripts, we don’t have to eject our application!
In the project folder’s root directory, create a new file .rescriptsrc.js and add the following code:
module.exports = config => {
    config.target = 'electron-renderer';
    return config;
}
This script modifies the webpack config used by React and changes its target to electron-renderer which would give us access to Node.js modules.
Now in your package.json, we need to change the scripts property such that every place we use react-scripts will now have rescripts. Therefore, these lines:
"scripts": {
  "start": "react-scripts start",
  "build": "react-scripts build",
  "test": "react-scripts test",
  "eject": "react-scripts eject",
  "app-dev": "concurrently \"BROWSER=none npm run start\" \"wait-on http://localhost:3000 && electron .\""
},
Should be changed to this:
"scripts": {
  "start": "rescripts start",
  "build": "rescripts build",
  "test": "rescripts test",
  "eject": "rescripts eject",
  "app-dev": "concurrently \"BROWSER=none npm run start\" \"wait-on http://localhost:3000 && electron .\""
},
Before we write code to test that it works, be sure that Electron is configured correctly as well. In the createWindow() function of public/electron.js, when you create a new BrowserWindow object you must have the following properties set:
webPreferences: {
    nodeIntegration: true
}
That property inserts the require function into the DOM. By default, it’s set to false. Our earlier example code already sets it to true but just be sure you do the same in future projects!
Let’s try to use a Node.js module in our React code to see if it works. If you still have the app running from earlier, exit so that we can start the app using rescripts. We’ll use the fs module to list all the files and folders in the current directory.
In src/App.js add the following code before the function that creates the main App component:
const fs = window.require('fs').promises;
fs.readdir('./').
  then((files) => {
    files.forEach(file => {
      console.log(file);
    });
  }).
  catch((error) => {
    console.error(error);
  });
In our app, our debugger should now look like this:
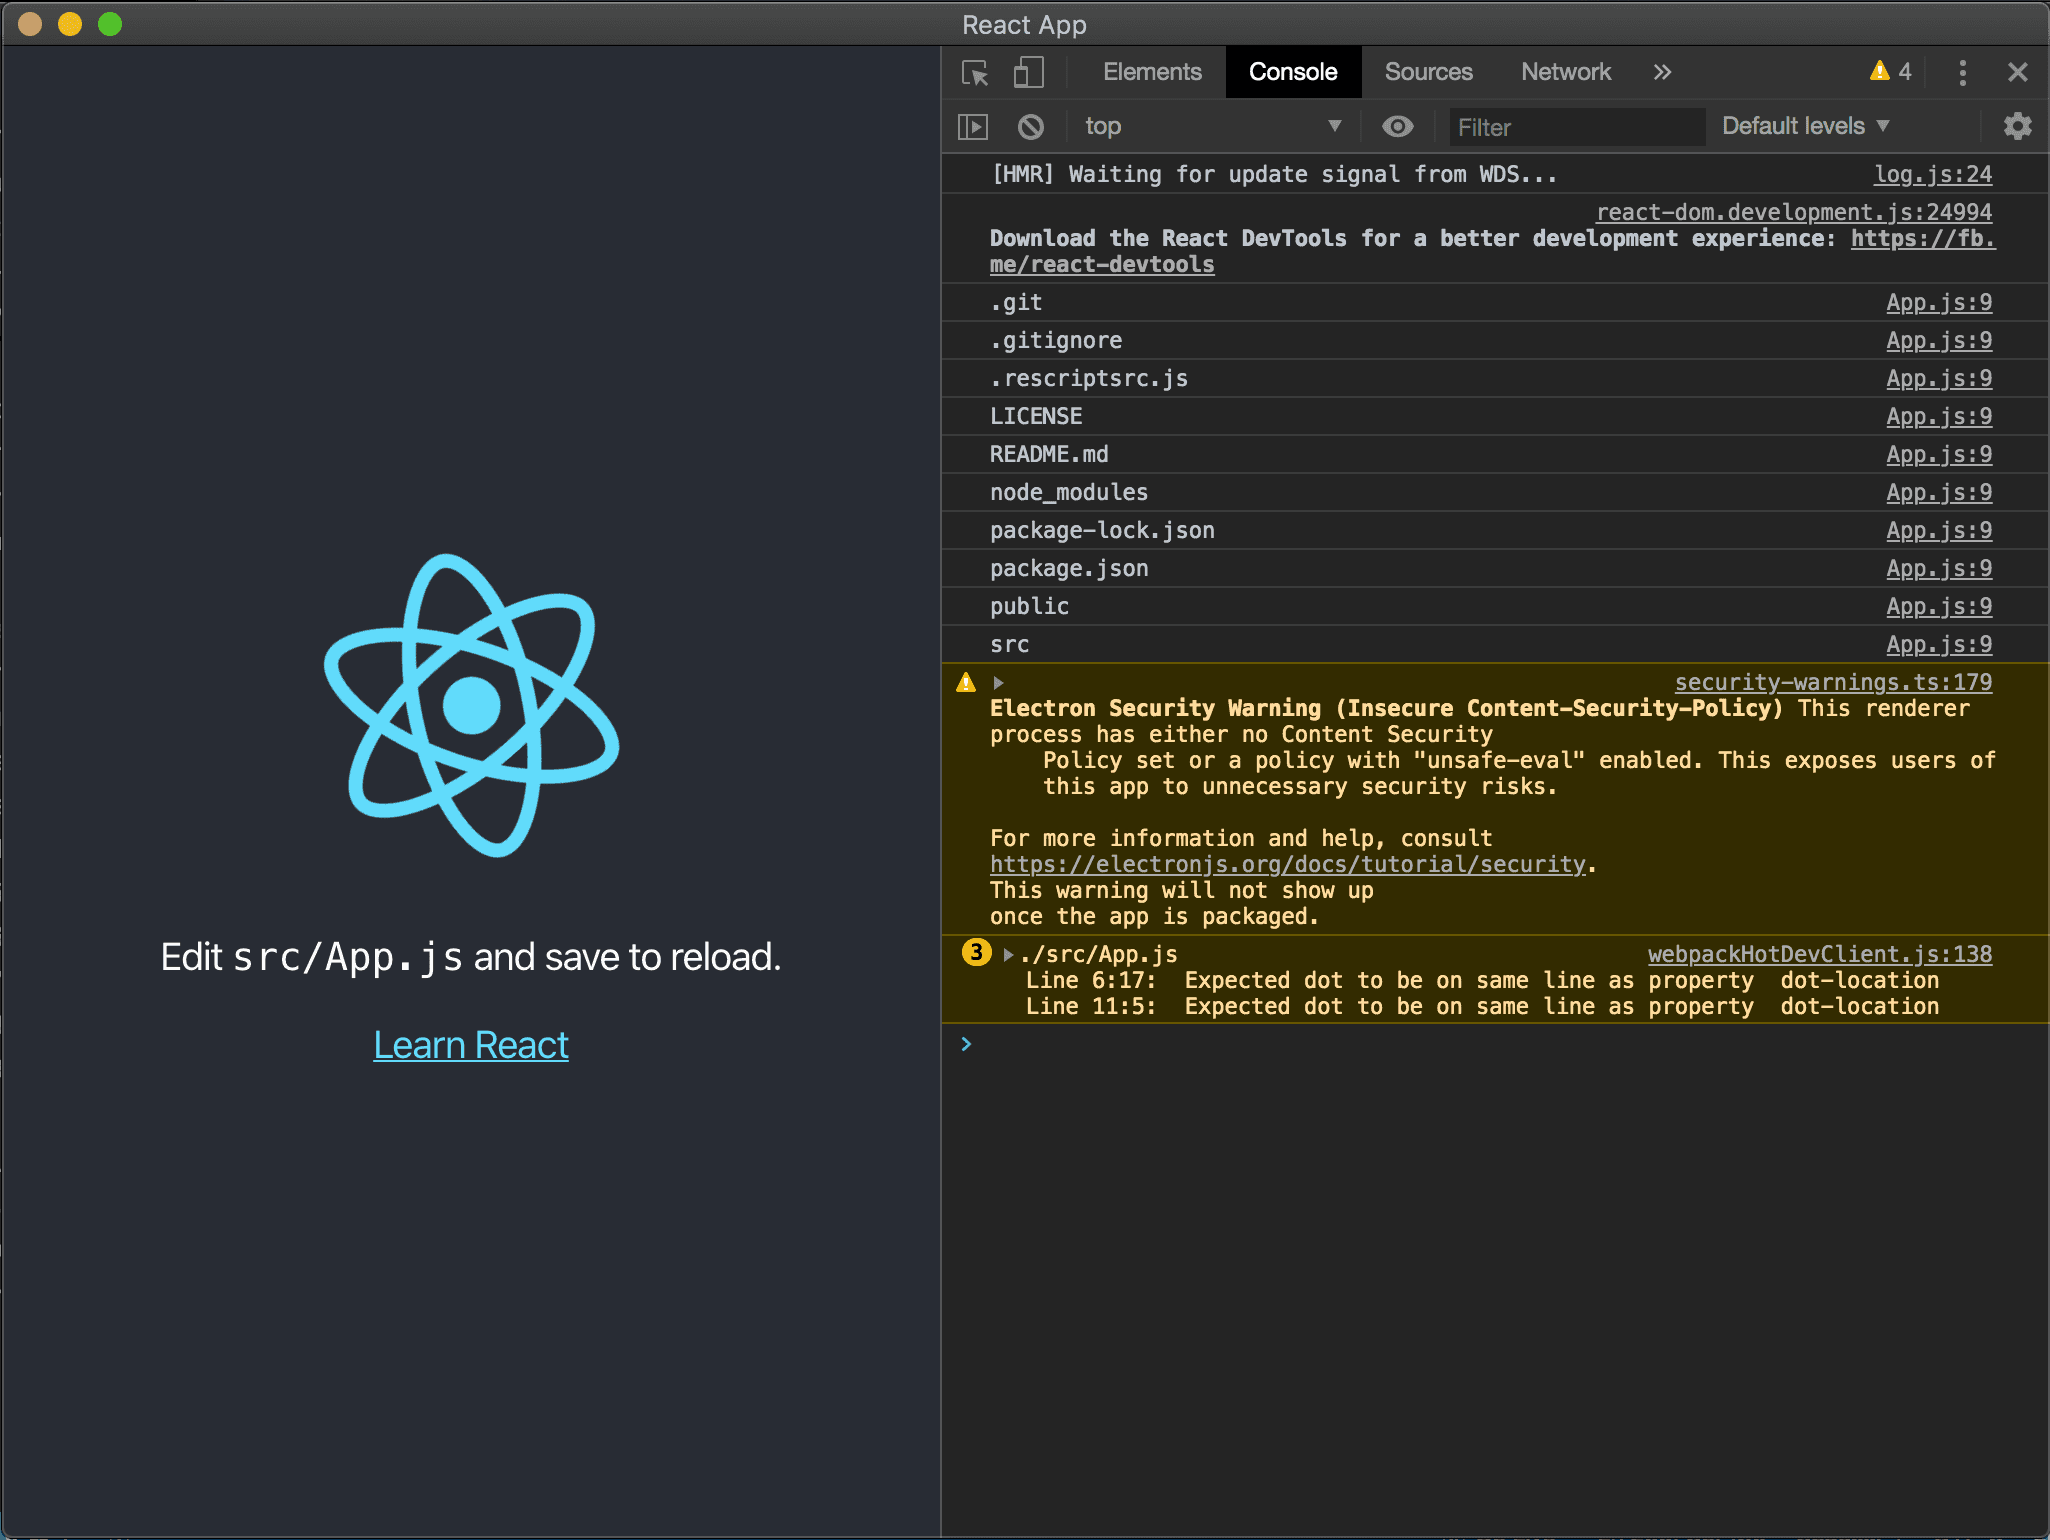
Sweet! The debugger shows the logs of the files and folders in the current directory, proving we got Node.js integration working as we need it to.
Moving Forward
This got me into a pretty happy place. It’s helping me build my Arduboy game uploader and I’ll probably continue to use this setup for future Desktop apps I’m building with React. You can see the code for this tutorial here: https://github.com/msanatan/react-electron-app.
Happy app developing!